Table of Contents
In today’s internationally interconnected world, having a reliable internet connection is a need, not a choice, for both work and enjoyment. While most internet users now connect using Wi-Fi routers rather than wired Ethernet connections, there are still certain circumstances when the latter are better. However, wireless communication is essential for portable electronics such as smartphones, tablets, and similar gadgets. Fortunately, setting up a Wi-Fi hotspot on a Mac access point, allows you to connect all of your devices to the internet simultaneously. This comprehensive essay explores the many approaches to satisfy different connection types and device compatibility preferences
Why Turn Your Mac Into a Wi-Fi Hotspot
Before we go into the specifics, let’s recap why setting up a wifi hotspot on your Mac is brilliant. Even with Ethernet connections’ dependability, speed, and security, mobile devices like phones and tablets increasingly depend on wireless networking. Converting your Mac into a wifi hotspot increases productivity and connection quality by facilitating easy access to the internet for other devices.
Creating a Wi-Fi hotspot offers several advantages:
Flexibility: You may connect many devices to the internet at once with a Wi-Fi hotspot, giving you more flexibility and convenience.
Portability: Wi-Fi hotspots are ideal for use while traveling, working outside, or in other hard-to-reach locations since they provide internet access without requiring a long-term cable connection.
Cost-Effectiveness: With Wi-Fi hotspots, you don’t need any extra gear or data plans. This saves you money because you don’t have to pay for expensive cell data or different internet plans for each device.
Enabling Internet Sharing in macOS
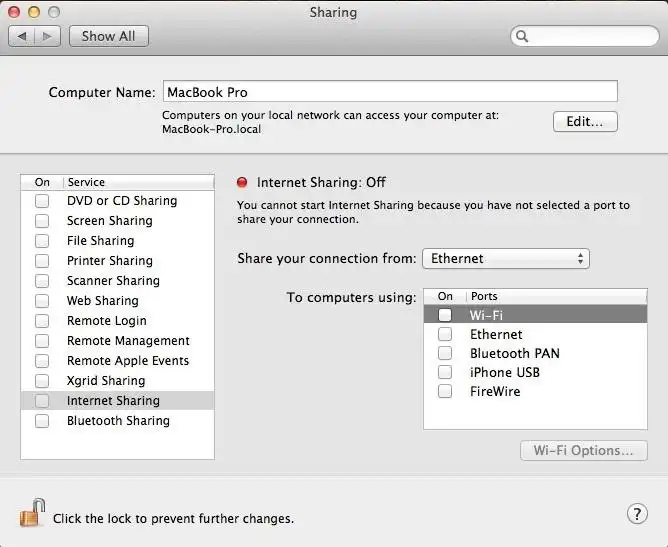
Internet Sharing is built into macOS and makes it easy to connect other devices to your Mac’s internet link. The steps to turn on Internet Sharing are the same whether you connect via Ethernet, USB, Wi-Fi, or Bluetooth.
- Launch System Preferences – Navigate to System Preferences from the Apple menu or the Dock to begin the setup process.
- Access Sharing Settings – Within System Preferences, locate and click on the “Sharing” icon to access sharing settings.
- Enable Internet Sharing – Select “Internet Sharing” from the side menu to initiate the sharing configuration.
Setting Up a Mac Hotspot Using Different Protocols
The setup process is different depending on which connecting method you choose: Ethernet, USB, Wi-Fi, or Bluetooth This is how each method works:
For Ethernet
- Select Ethernet Connection – Choose “Ethernet” as the source connection under “Share your connection from.”
- Choose Wi-Fi as Sharing Protocol – Tick the box next to “Wi-Fi” to designate it as the sharing protocol.
- Configure Wi-Fi Settings – Click on “Wi-Fi Options” to configure your hotspot’s network settings, including network name and security.
- Initiate Sharing – Check the box next to “Internet Sharing” and click “Start” to activate the Wi-Fi hotspot.

For USB Wi-Fi Adapter
- Connect USB Wi-Fi Adapter – Connect and configure your USB Wi-Fi adapter as per the provider’s instructions.
- Select USB Adapter as Source Connection – Choose your USB Wi-Fi adapter under “Share your connection from.”
- Specify Wi-Fi as Sharing Protocol – Tick the box adjacent to “Wi-Fi” to designate it as the sharing protocol.
- Configure Wi-Fi Settings – Customize your Wi-Fi network settings by clicking on “Wi-Fi Options.”
- Activate Internet Sharing – Check the box next to “Internet Sharing” and click “Start” to initiate sharing via Wi-Fi.
For Bluetooth
- Choose Source Protocol – Select the desired source connection under “Share your connection from.”
- Opt for Bluetooth PAN – Tick the box next to “Bluetooth PAN” to designate it as the sharing protocol.
- Enable Internet Sharing – Check the box next to “Internet Sharing” and click “Start” to activate Bluetooth sharing.
Considerations and Security Measures
Even though setting up an access point Mac address Wi-Fi hotspot is convenient, security must always come first. Your hotspot will be safe as long as you use strong security methods like WPA2 or WPA3 Personal. Using VPN services, such as MacKeeper’s Private Connect, also makes your online safety better by securing your internet data.
Additional Tips for Optimizing Your Mac Hotspot
Signal Strength Optimization: Put your Mac in the middle of the room to make sure that all of the devices that are linked have the best Wi-Fi signal power.
Bandwidth Management: Watch and control how much data is being used to keep the network from getting too crowded and make sure that everyone can browse easily.
Regular Maintenance: Check and update your Mac’s software and network settings on a regular basis to keep it running at its best and keep your data safe.
Conclusion
Transforming your access point Mac address into a Wi-Fi hotspot opens up a world of possibilities, allowing seamless internet connectivity for all your devices. By following the simple steps outlined above, you can harness the power of Internet Sharing in macOS to create a secure and reliable hotspot. Whether it’s through Ethernet, USB, Wi-Fi, or Bluetooth, your Mac serves as a versatile hub for internet access, enhancing productivity and connectivity in today’s digital landscape. With the right security measures in place, you can enjoy the convenience of wireless connectivity without compromising on safety and privacy.
Also Read:

