Table of Contents
The MacBook is a variety of Macintosh notebook computers. Apple M1 Chip modifies this laptop. One of the main features is the extended battery life professionals use Mac Pro because they use different applications for processing. A Macbook operates on macOS software that delivers smooth performance to the users. The cheapest Macbook is the Apple Macbook Air.
Screenshot on Mac
The Screenshot is the best method to keep the records. If you can not download that image or data, you can take a screenshot of that data for the records. This screenshot facility is available to all Mac users without downloading any app. Whenever you want to show anything to any person, you are not competent to share the data. Thus, you can take a screenshot and share the data with the person you want to share.
In the following section, we talk about how to take screenshots on Macbook Pro, Macbook Air, and Macbook. If you do not know how to take a screenshot on Mac, we will help you and provide a guide to you. You can take a screenshot using various methods.
How to screenshot on Macbook
You can take a screenshot on your Macbook using the shortcut keys. Users will be able to take a screenshot of a selected portion, a whole screen, and a window. Furthermore, you can use different methods to make a screenshot.
Method 1: For taking a screenshot of the Whole screen

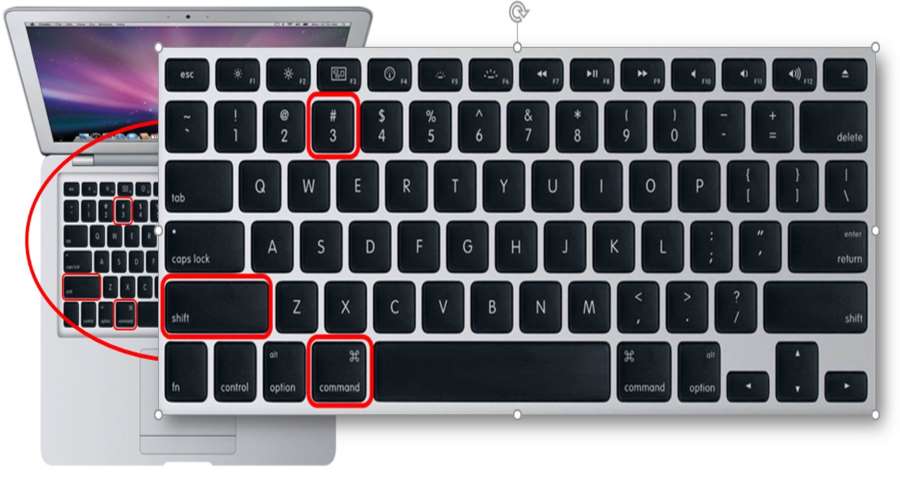
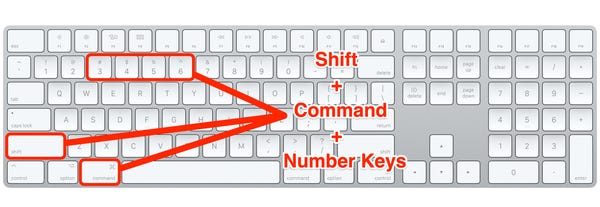
You have to press Shift + command + 3. You can press the command button, Shift, and press 3 for a screenshot.
The Screenshot appears at the bottom side of the right corner of your Mac.
If you want to edit the Screenshot, follow these steps:
- Firstly, right-click on the Screenshot.
- Then, swipe on the thumbnail to cancel it. Hold for some time to save it to your desktop.
- If you want to copy a screenshot to your clipboard, press the control key during the Screenshot.
Method 2: Take a screenshot of the selected portion
For taking a screenshot of the selected partition.
- Firstly, press shift + command + 4.
- To select the portion, use the mouse and select the area.
- Now, You have to tap the spacebar to choose the partition.
- If you try to cancel the Screenshot, hit the escape key.
- Therefore, press the control key when you want to copy the data to the clipboard.
Method 3: For taking a screenshot of a window, menu
For taking a screenshot of a window and a menu.
- Firstly, press shift + command + 4 + space bar.
- While taking a screenshot, a camera icon will appear on the right side.
- Click on the different windows, the menu bar, menu items, a blue highlight that will show you that you are ready to take a screenshot now.
- Finally, tap on the window or menu for the Screenshot.
- Also, you can hold the option key for removing the shadow border from the window screenshots.
Change in settings of the Screenshot

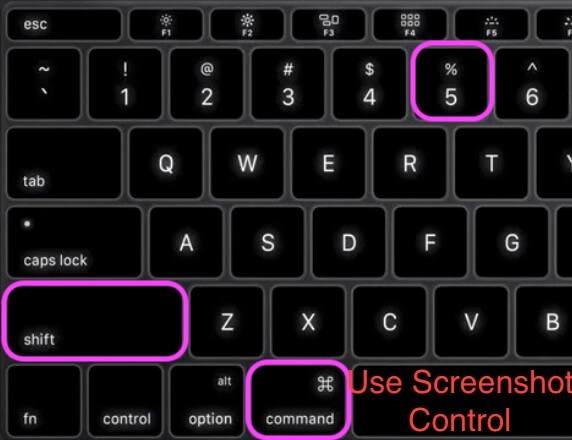
For the change in the settings for the Screenshot, Press Command + Shift + 5. It will show the screenshot control bar. This tool will help you choose how you want to take the Screenshot. Also, it will enable you to make a screen recording.
When you want to change the preference for the screenshots, follow these steps.
- Firstly, tap on the Options to change your screenshot preferences.
- Also, you can add a timer to the Screenshot, remove the floating thumbnail, and save it to the options.
- Now, a capture button will show up. Click on it to capture the Screenshot.
- Moreover, to take several screenshots of a selected portion, click on Remember Last Selection. After this, press Shift + Command + 5 for a screenshot.
How to screenshot on MacBook Air

For taking a screenshot on the Macbook Air, you can follow the above methods to capture a screen.
Command + Shift + 3: For capturing the whole screen, press this shortcut. It will appear on the bottom side of the screen. Therefore, you can make any changes you want to make to it. A thumbnail will appear in the corner tap on it to edit it.
Shift + Command + 4: If you want to take a screenshot of a specific portion. You will press Shift + Command + 4. Then, your cursor will change into a crosshair. After it, press the spacebar to select the portion.
Shift + Command + 4 + Space bar: If you want to capture the specific window and menu, use this shortcut key for the Screenshot. You can copy it on the clipboard.
Therefore, you can use these shortcuts for a screenshot.
Conclusion
Briefly, we know how to take a screenshot on the Macbook. If you want to save some information and data, and there is no option to deliver the data, you can take the Screenshot. Information about the Screenshot is essential for the users. You can use different shortcut keys for taking screenshots. These shortcut keys help you take the screenshots of full screen, a selected portion, and a window. Some apps do not support screenshots, even though MacBook supports screenshots.
Also Read: What’s The Difference Between Macbook Air And Macbook Pro

