Table of Contents
When you’ve put significant time and effort into creating an important document, regardless of its purpose, it’s essential to ensure it looks flawless. A major part of this is getting the formatting right. If you happen to notice an additional page that doesn’t belong, you’ll want to remove it. The question raised is if you want to delete a page in Google Docs then what are the best ways to do it?
That extra page could be what’s keeping you from achieving a better grade, a promotion, or even a potential book deal, and you never know which. If you’re using Google Docs, there are several methods to eliminate an extra page, depending on why it’s there in the first place. Below, you’ll find a few recommendations for deleting a page in Google Docs using any web browser on your Mac or PC.
Want to Know How to Delete a Page in Google Docs: 4 Most Effective Tips
Multiple factors can cause the presence of extra pages or empty spaces in your Google Doc. This article will guide you on how to delete a page in Google Docs, whether it’s an empty page, a page break, or unusual formatting.
1. Using the Delete Key Option

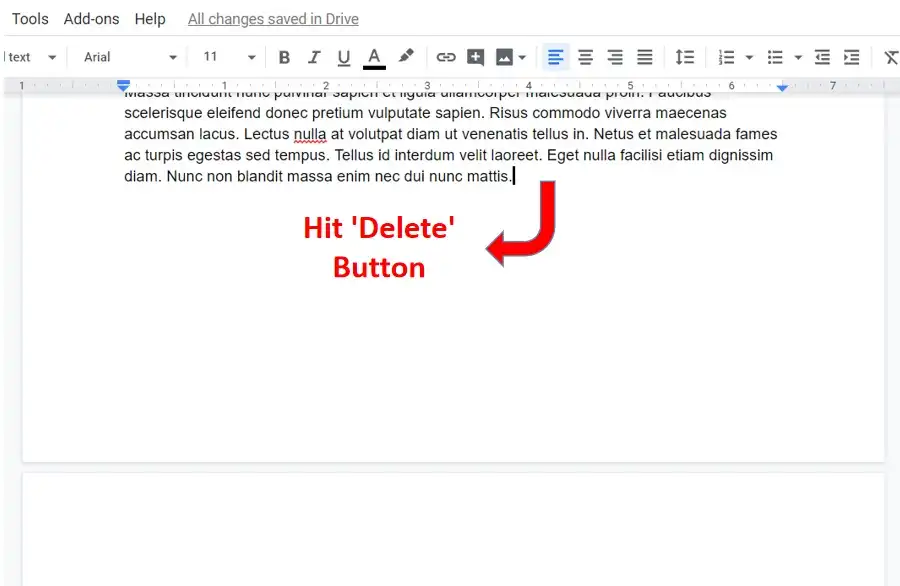
This is a practical way to delete a blank page in Google Docs or other common word-processing software like Microsoft Word. Here’s a step-by-step summary of the process:
- Identify the unwanted page: Determine which page you want to remove from your document. For example, if you have a 3-page document and want to delete page 2, place your cursor at the end of page 1 or the beginning of page 2.
- Select the unwanted content: Click and drag your cursor downward from the starting point to the end of the page you want to delete.
- Highlight the entire page: The selected area should now be highlighted or have a shaded mark through it, indicating that it’s selected.
- Delete the page: Once the page is fully selected, press the “Delete” or “Backspace” key on your keyboard.
- Check the cursor position: After deleting the page, pay attention to where your cursor ends up. If it’s positioned between two sentences, press the “Enter” key to create a new paragraph where the deleted page used to be.
- Avoid printing the page (optional): If you don’t want to delete the page permanently but wish to exclude it from printing, you can use the “File > Print” option in your word processing software. Select the “Custom” option under the “Pages” setting and specify which pages to print.
2. Undo a Page Break
Page breaks can sometimes create blank pages in a document, and removing them is a straightforward process.
- Locate the page break: Page breaks often manifest as large blank spaces or extra whitespace in a document. To verify that it’s a page break, press the down arrow key.
- Position the cursor: Move the cursor just before the page break you want to remove. You can also position it right after the page break if you prefer.
- Remove the page break: To delete the page break, you can press the “Delete” key if you’re positioned before the page break or the “Backspace” key if you’re positioned after it.
- Consolidate the pages: After successfully removing the page break, the pages in your document will be consolidated, and any blank pages caused by the page break will no longer appear.
3. Adjust Line Spacing

Google Docs may sometimes add extra spacing between paragraphs, and this can lead to extra pages or unwanted blank spaces. To resolve this issue, you can adjust the line and paragraph spacing settings as you described.
- Select just before the first word in the document.
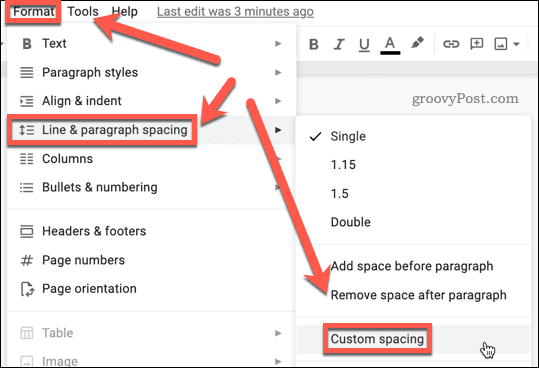
- Go to the “Format” menu in Google Docs.
- Choose “Line & paragraph spacing” and then select “Custom spacing.”
- In the “Custom Spacing” dialog box, look for the “After paragraph spacing” option. Lower the number or set it to 0 to eliminate the extra spacing after paragraphs.
- After adjusting the spacing, select “Apply” to save the changes and exit the settings.
If you find that the extra spacing issue persists after following these steps, you can try the following additional step:
- If the problem is not resolved, repeat the previous steps, but this time, select the first sentence after the blank space in your document.
- In the “Custom Spacing” dialog box, change the “Before paragraph spacing” value. Lower this number or set it to 0.
- Select “Apply” to save the changes.
4. Change the Margins
Large margins can also contribute to the creation of extra pages in a document. Adjusting the margins in Google Docs can help you make the most of the available page space and prevent unnecessary blank spaces or additional pages.
- Go to the “File” menu in Google Docs.
- Select “Page setup” from the dropdown menu.
- In the Page Setup dialog, you can adjust the margin values. If, for example, the bottom margin is set to a value that’s too large, it can cause text to flow over onto the next page, resulting in extra pages.
- Lower the margin values as needed to reduce the whitespace. You can change the top, bottom, left, and right margins according to your preferences.
- After making the necessary adjustments, select “OK” to save and exit the page setup settings.
Final Wrap Up
These tips will delete a page in Google Docs, effectively eliminating the page. Adjusting formatting settings can also help ensure the document flows as desired without additional pages.
Also Read: How To Drop A Pin In Google Maps On Your PC Or Phone

