Table of Contents
In the rapidly evolving world of digital communication, it is essential to ensure recipients get your important emails and take note of them. Outlook read receipt is a beneficial feature of Microsoft Outlook, a multifunctional personal information organizer. By activating this feature, you may get notifications anytime someone views or opens one of your emails, which would improve communication transparency. We’ll go over every step to learn how to request read receipts in Outlook and get it to function beautifully here.
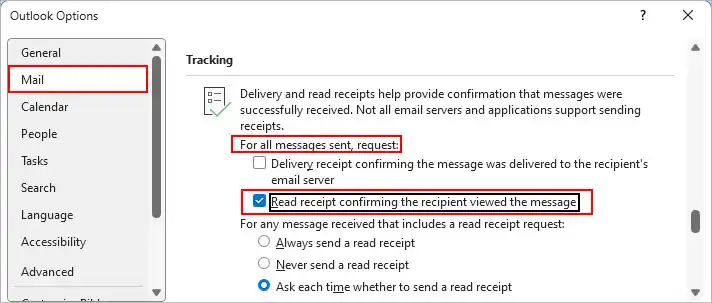
Configuring Default Read Receipts for All Messages on a Windows PC
- Launch Outlook to get things going on your Windows 10 PC.
- Select “File” On the main menu and then “Options.”
- Locate the Tracking area under the Mail tab.
- Verify if “Read receipt confirming the recipient viewed the message” is activated.
- After making your options, click “OK.”
This setup will automatically cause your future emails to contain a read-receipt request. It’s crucial to remember that not all recipients will wish to get read receipts and that specific email clients could not even support them. To get the most out of essential conversations, use read receipts selectively.
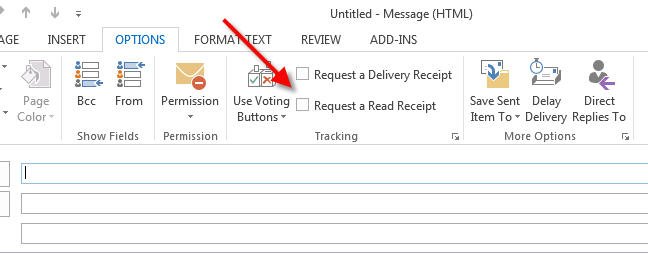
Initiating Individual Read Receipts on a Windows PC
- On a Windows 10 PC, launch Outlook and begin composing an email.
- Navigate to the “Options” menu to view the advanced settings.
- In the Tracking section, activate “Request a Read Receipt”.
- Check that your message is prepared before hitting “Send.”
- Go to “Tools” and uncheck the “Request Read Receipt” option to reverse the read-receipt request for a specific message before sending it.
Requesting Read Receipts on Outlook for Mac
While read receipts are not enabled by default in Outlook for Mac, you may activate them for specific messages:
- Outlook 2019 for Mac (version 15.35 or later) and Outlook for Microsoft 365 support the new email composing feature.
- To see the advanced settings, choose “Options“.
- Navigate to “Request Receipts” and activate the feature “Request a Read Receipt.”
- Click “Send” on the “Message” page when you’re prepared to send your message.
It’s important to understand that read receipts in Mac Outlook are limited to accounts that are a part of Exchange Server or Microsoft 365. They also operate independently. Moreover, they are incompatible with any POP or IMAP email provider.
Outlook.com and Outlook on the Web Read Receipts
Outlook.com, the free webmail version of Microsoft Outlook, and Outlook on the web when using a personal Microsoft 365 account do not include a default or individual read-receipt request option.
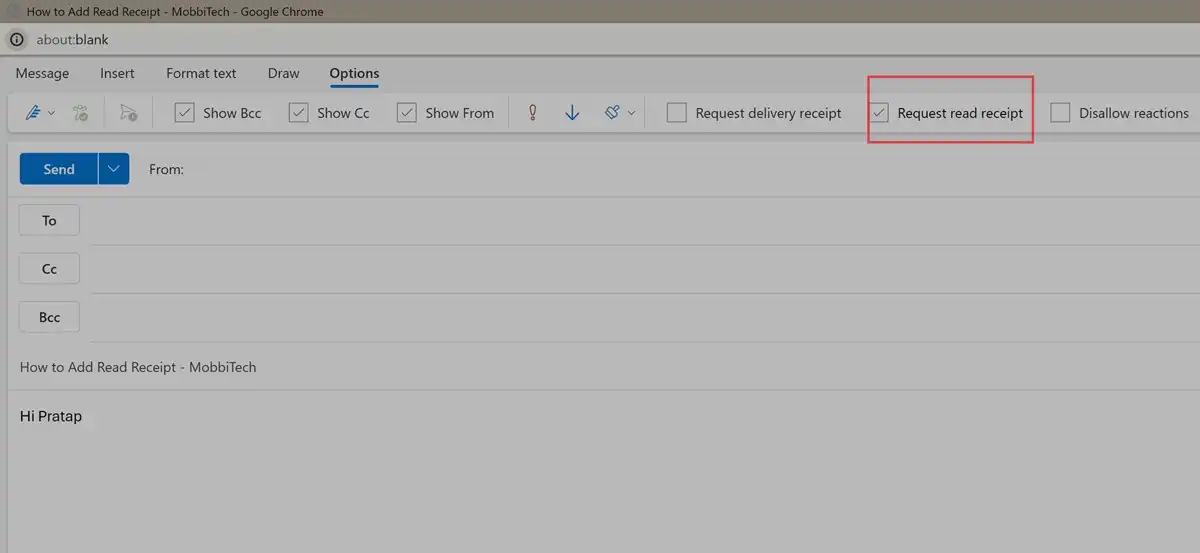
As part of your Microsoft 365 configuration, you may still use Outlook on the web with an Exchange server account to get read receipts:
- Find the Menu (three dots) in the message-composing window and click on it.
- Press “Show message options” to see the valuable information.
- After activating “Request a read receipt,” you may submit your answer.
Outlook on the Web—the version accessible via a web browser with a Microsoft 365 account—and Outlook.com, the free webmail client, are pretty different from one another.
The Advantages of Utilizing Read Receipts
Adding read receipts to your Outlook experience might enhance email communication. It offers many advantages. We’ll look at a few significant benefits:
Confirmation of Message Receipt: Spread the word that your important messages are being received and sent.
Enhanced Accountability: Receive alerts when someone opens one of your emails to help you hold them accountable.
Time-Sensitive Communication: Knowing when your message is read is critical, mainly if it includes time-sensitive information.
Critical Decision-Making: Read receipts demonstrate the receiver’s level of engagement and aid in critical decision-making in corporate contexts.
Selective Application: Use read receipts carefully to ensure that important messages have the most impact.
Overcoming Potential Challenges
Despite its value, there are a few considerations to make while using read receipts:
Recipient Discretion: It is up to the receivers whether or not they want to send read receipts.
Client Compatibility: If some email clients are incompatible with read receipts, the function’s dependability may be jeopardized.
Account Type Restrictions: IMAP and POP email accounts cannot have read receipts enabled by Outlook for Mac; these accounts can only be used with Microsoft 365 or Exchange Server.
Conclusion
It’s not only a convenience to read receipts in Outlook; adding them is a conscious effort to improve your email communication. By following the easy instructions in this article, you may personalize your read-receipt options and increase the effectiveness and accountability of your email communications. Outlook offers you many alternatives for managing read receipts, regardless of whether you’re using a Mac or Windows PC. This means you can be more proactive and benefit from your communication endeavors. Ensure that your emails are sent and acknowledged by using read receipts to foster a more accountable and transparent email communication environment. Add read receipts to your email communication toolkit to keep on top of the game.
Also Read: A Quick Guide to Backup IMAP Emails Using Microsoft Outlook