Table of Contents
When working with Java, especially during development or while running Java-based applications, you may encounter the error message “Error occurred during initialization of VM: Could not create the Java Virtual Machine.” This error can be both confusing and frustrating, particularly for beginner Java programmers. Understanding the root causes behind this error and knowing how to systematically diagnose and resolve it is crucial for efficient troubleshooting.
This guide is designed to provide an in-depth technical troubleshooting tutorial that targets Java developers who are familiar with basic Java concepts but are new to JVM troubleshooting. Here, we will analyze the error, provide detailed diagnostic approaches, troubleshoot steps with code examples and configuration snippets, and cover platform-specific solutions for Windows, Linux, and macOS environments. We will also discuss required Java Development Kit (JDK) versions, system configurations, memory allocation considerations, and performance implications.
It is important to remember that this error is most commonly related to incorrect JVM argument configurations, such as memory allocation settings. However, the error might also be affected by other factors such as incompatible JDK versions, environment variable issues, or operating system constraints. By following a systematic diagnostic method, you can prevent similar issues in your ongoing development lifecycle.
Error Analysis
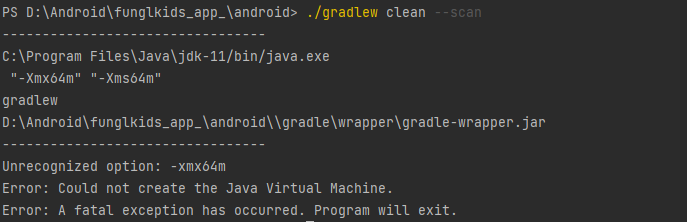
The specific error message “Could not create the Java Virtual Machine” generally points toward configuration problems during the initialization phase of the JVM. The error typically arises if the JVM is provided with invalid or conflicting command-line arguments, particularly those related to memory settings. Common issues include:
- Improper Memory Allocation Parameters: Over-specifying heap size using flags such as
-Xmx(maximum heap size) and-Xms(initial heap size) This error if the values exceed the available system memory. - Incorrect or Unsupported JVM Options: Sometimes, options that are valid for one version of Java may not be supported in another version.
- System Resource Constraints: Insufficient system memory or conflicts with the operating system’s memory allocation policies can also trigger the error.
- Environment Variable Misconfiguration: JAVA_HOME or PATH environment variables, if not set correctly, may cause the JVM to fail at initialization.
- Corrupted Installation: An incomplete or corrupted installation of the Java Development Kit and corresponding tools may leave the system unable to create the required virtual machine instance.
Additionally, if you are running a 32-bit Java version on a 64-bit operating system or vice versa, or if there is a mismatch in expected libraries, the VM may not initialize correctly.
Understanding these potential causes is a first step to diagnosing the error. The next sections will walk you through a series of systematic troubleshooting procedures to resolve the error in various environments.
Troubleshooting Steps
The following troubleshooting steps are designed to help you diagnose and resolve the error “Could not create the Java Virtual Machine”. We have organized the content into a systematic workflow, ensuring that each stage builds a foundation for the subsequent steps.
1. Verify JDK Installation and Version
Before diving into memory configuration and environment variables, ensure that you have a valid and supported Java Development Kit installed on your system. Java SE 8, 11, or higher is encouraged following Oracle’s recommendations. You can check your installation by running:
java -version
javac -version
If the commands above raise errors or return version details that do not match your intended use case, consider reinstalling or updating your JDK. For instance, if your project requires JDK 11, verify that the version output starts with “11”.
2. Examine JVM Arguments
In many cases, errors related to the JVM initialization occur due to incorrect JVM arguments. Options related to memory settings are most often responsible. The following are common flags and considerations:
- -Xmx: Specifies the maximum heap size for the JVM. For example,
-Xmx512msets the maximum heap size to 512 megabytes. - -Xms: Specifies the starting heap size. Small values, when combined with high values for -Xmx, can sometimes trigger issues if the underlying system does not have enough available memory.
- -XX:MaxPermSize: Used for specifying the maximum permanent generation size in older versions of Java (prior to Java 8). Java 8 and beyond have removed the concept of PermGen in favor of Metaspace.
Review the command or script used to start your Java application. For instance, a runtime command might look like:
java -Xms256m -Xmx1024m -jar myApplication.jarEnsure that the memory values set with -Xms and -Xmx are within the limits of your physical RAM. You can experiment with reducing these values to see if it resolves the error.
3. Adjust Memory Allocation Settings
If your memory allocation settings are indeed the issue, consider adjusting them based on your system’s available physical memory:
- For systems with limited memory, start with
-Xms128mand-Xmx256mand increment based on application requirements. - Avoid setting values that exceed the actual physical memory available on the system.
For example, modify your startup command to:
java -Xms128m -Xmx256m -jar myApplication.jarUse port monitoring tools or system resource monitors to confirm memory availability. On Windows, Task Manager; on Linux, commands like free -m or htop; on macOS, Activity Monitor.
4. Check Environment Variables
Environment variables such as JAVA_HOME and PATH are critical for the correct operation of the JVM. Verify that:
- JAVA_HOME points to the correct JDK installation directory.
- PATH includes the path to the JDK’s
bindirectory.
For a quick check on each operating system:
Windows
Open the Command Prompt and run:
echo %JAVA_HOME%
where java
If JAVA_HOME is not set or the path returned is incorrect, set the environment variable by navigating to “System Properties” > “Advanced” > “Environment Variables”, or use the command line:
setx JAVA_HOME "C:\Program Files\Java\jdk-11.0.x"Linux
Open a terminal session and run:
echo $JAVA_HOME
which java
If JAVA_HOME is not set properly, add the following lines to your .bashrc or .profile:
export JAVA_HOME=/usr/lib/jvm/java-11-openjdk-amd64
export PATH=$JAVA_HOME/bin:$PATH
Then run source ~/.bashrc to apply the changes.
macOS
Open the Terminal and run:
echo $JAVA_HOME
/usr/libexec/java_home --version 11
If JAVA_HOME is not configured correctly, add the following command to your .bash_profile or .zshrc:
export JAVA_HOME=$(/usr/libexec/java_home -v 11)
export PATH=$JAVA_HOME/bin:$PATH
Then run source ~/.bash_profile or source ~/.zshrc accordingly.
5. Modify the Java Configuration File (for IDE Users)
Integrated development environments (IDEs) such as Eclipse and IntelliJ IDEA sometimes use custom configuration files to set JVM arguments. For example, in Eclipse, the eclipse.ini file may specify JVM configuration. Open the file and inspect the settings:
-vmargs
-Xms256m
-Xmx1024m
Ensure that the values in this file are appropriate for your system’s configuration. If you are encountering memory issues, consider lowering the values to prevent exceeding available system memory.
6. Testing and Verification
Once the adjustments have been made, it is important to verify that the error no longer occurs. Follow these steps:
- Restart the Java application or command line prompting the error.
- Monitor resource usage, ensuring that the Java process operates within reasonable memory limits.
- Check the console output for any warnings or related messages that may indicate further configuration problems.
- Run a simple “Hello World” Java program with the new settings to validate that the JVM initializes successfully.
Here’s a simple “Hello World” program for testing purposes:
public class HelloWorld {
    public static void main(String[] args) {
        System.out.println("Hello, World!");
    }
}
Compile the program with javac HelloWorld.java and run it using:
java -Xms128m -Xmx256m HelloWorldIf the program runs without errors, then the settings have likely resolved the JVM initialization error.
7. Other Considerations and Advanced Configurations
If you still face the error after adjusting memory settings and environment variables, consider the following advanced possibilities:
- JVM Bug: Rarely, the error might be due to a bug in a specific version of Java. Consult the official Java bug database or release notes for the version you are using. Upgrading to a more recent version (e.g., Java SE 11 or Java SE 17) might resolve the issue.
- Conflicting Software: Verify that no other running applications are interfering with the JVM process. Applications that heavily consume system resources or malware scanners might inadvertently lock system memory.
- Custom Launch Scripts: If you are using custom scripts to launch the application, check that no conflicting parameters are being passed. Validate each argument against official Java documentation.
Sometimes, combining arguments in the wrong order or using deprecated options can cause initialization issues. Revert to the default configuration with minimal arguments and incrementally add configuration until identifying the problematic option.
Best Practices and Prevention Tips
Preventing the “Could not create the Java Virtual Machine” error is as important as troubleshooting it once it occurs. Here are some best practices to ensure smooth JVM operation:
- Regularly Update Your JDK: Keep your JDK up-to-date with the latest stable release. Newer versions often include bug fixes related to memory management and JVM initialization.
- Review Command-Line Arguments: Periodically review the parameters passed during JVM startup, especially if integrating automated build systems or IDEs. Document intended memory use and rationale behind settings such as
-Xmsand-Xmx. - Monitor System Resources: Use monitoring tools to track system memory usage and JVM performance. For instance, tools such as VisualVM, JConsole, or operating system-based monitors (Task Manager, top, Activity Monitor) can help identify resource bottlenecks.
- Maintain Consistent Environment Variables: Ensure that JAVA_HOME and PATH variables are consistent across all development, testing, and production environments. This reduces discrepancies that might lead to initialization errors.
- Test on Multiple Operating Systems: Since memory allocation and system configuration differ between Windows, Linux, and macOS, test your Java application on all target platforms to catch platform-specific issues early.
- Documentation and Version Control: Document any JVM arguments or configuration changes made as part of resolving the error. Utilize version control systems (such as Git) for configuration files like
eclipse.inior shell configuration files. This allows you to track changes and easily revert if necessary.
By applying these best practices, you can not only resolve the error in question but also create a robust environment that minimizes the occurrence of similar issues in future development.
In addition, automated testing and continuous integration workflows that include JVM start-up health checks should be considered. This proactive approach can catch configuration issues before they go unnoticed in production.
Memory Allocation and Performance Implications
Setting the proper memory allocation for the JVM directly affects the performance of your Java applications. While increasing the maximum heap size (-Xmx) allows an application to process larger data sets or more concurrent processes, it also increases the load on the system’s physical memory. Conversely, setting too-low a value may cause frequent garbage collection (GC) cycles, which could degrade performance. A balanced approach that is based on the application’s profile, along with load testing, is advised.
On systems with constraints:
- Monitor GC logs (
-verbose:gcor-XX:+PrintGCDetails) to identify if memory allocation is triggering performance bottlenecks. - Use GC tuning flags if needed, and update your JVM arguments based on the performance metrics.
- Consider dynamic memory allocation strategies where available, and test configurations under expected load conditions.
Conclusion
The “Error occurred during initialization of VM: Could not create the Java Virtual Machine” is a common error with several potential causes, predominantly related to memory allocation and environment configuration. By following a systematic diagnostic approach—starting with verifying your JDK installation and environment variables, carefully reviewing and adjusting JVM arguments, and testing across different operating systems—you can effectively resolve this error.
The troubleshooting method explained in this guide ensures that beginner Java programmers gain both a solid understanding of JVM configuration and the practical skills needed to enhance application performance. Whether you are working in Windows, Linux, or macOS, the detailed steps and examples provided here should help you quickly identify the root cause of the issue and prevent similar problems in the future.
Remember, the objective is not only to resolve the specific error but also to adopt best practices for JVM configuration and system resource management. Consistent monitoring, proper documentation, and periodic updates of your development environment will contribute to a more stable and performant Java application.
Also Read: